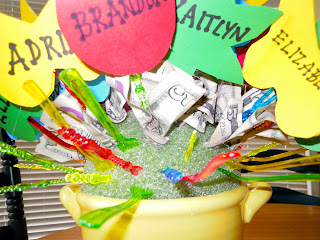
I looked for something like this on Pinterest, but couldn't find it, so I made it up myself. I'm the room mother for my son's class and he has an awesome teacher. It was her birthday and I wanted to give her money collected from the parents, but I wanted to do it in a creative way. So I thought I would make some sort of money tree or money bouquet.
I bought a vase and a foam floral ball from Hobby Lobby. I pushed the ball into the vase so it wouldn't budge. I bought little brightly-colored plastic appetizer forks and swords at the dollar store. I collected $5 bills from the parents and twisted them around the base of the forks and swords before plunging them into the foam ball. Some of the bills got punctured, but they are still usable. Then I made double-sided flowers and butterflies out of card stock and wrote each child's name on it with a Sharpie. Using my hot glue gun, I attached the card stock name card to the tops of the swords and forks.
I added the left over forks and swords to the bottom ⅓ of the foam ball to fill in the gaps. I was running short of time or I would have tried to cover the foam with something - burlap, glued on leaves or floral moss would all work. Since graduation season is just around the corner, I am going to use this idea again, but on a smaller scale and try to make it look a little more polished/finished. I will either write nothing on the card stock or inspirational words like "Faith," "Blessings," etc.
Friday, April 5, 2013
Monday, March 25, 2013
Kid's Handwritten Garden Marker Signs
I borrowed this picture from an awesome craft blog called "the blue basket." I think these garden signs are so cute and they preserve your child's handwriting at this particular age.
See all the instructions here:
http://thebluebasket.blogspot.com/2012/05/mothers-day-gift-garden-markers.html
See all the instructions here:
http://thebluebasket.blogspot.com/2012/05/mothers-day-gift-garden-markers.html
I looked into buying a wood burner - they are under $10 and I thought of a few other uses for it (my desire to create some more yard art included), so I'm going to get one.
Monday, March 11, 2013
Paintings with Initials
I also borrowed this idea from Pinterest. Take a blank canvas and use masking tape to "write" the child's name or initials on it. Then let them go to town with paints. Make sure they paint over every white space and especially in the crevices around the letters. Wait until its dry and then remove the tape to reveal the letters underneath. You could get creative with the letters using glitter, ribbon or puffy paint. I used a Sharpie to outline and define my child's letters afterwards, but I really like it better before I did that.
Here are the blank canvases with tape letters:
Here are the blank canvases with tape letters:
And the finished projects! Aren't they great?
Blank Face Print Out
I saw these blank face print outs used in my son's preschool class. They fashioned play dough for the features and hair, but we used crayons at home. You could also get creative and bust out the googly eyes, yarn, buttons, etc. I looked up "blank face" on Google image search to get these.
The print outs:
The print outs:
And the result:
Easter Thumbprint Signs (or Cards)
Full disclosure: yep, stole this one from Pinterest too. Thumbprints, Sharpie, crayons, hole punch, ribbon… done! Could also be made into a really cute Easter card for the grandparents.
Here were our inspiration print outs:
Here were our inspiration print outs:
Here's how it looked with just the thumbprints. These took about 30 minutes to dry and then we started applying the Sharpie and crayons.
And here are the results:
ABC Walking Game
Full disclosure: I stole this from Pinterest. This is the back of a paper plate. All you do is write the alphabet around the rim and cut between each letter. Then you take your child for a walk and they have to spot things that start with the letters. After they use the letter, they fold it back and go on to another one.
Subscribe to:
Comments (Atom)


